cute amigurumi, crafts, patterns, and more!

Pages

▼
Showing posts with label tutorial. Show all posts

Photographing Amigurumi & Crafts Tips: Lighting

1. Natural Light - Outdoors

Shade and overcast days are best for even lighting.

Too much direct sunlight can make it difficult to capture the true colors, overexpose areas, and cast distracting shadows. You can block sunlight with a sheet or paper.
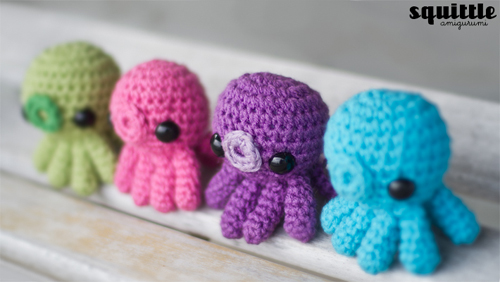

Overcast.

2. Natural Light - Indoors

Use indirect light from windows.

You can also use materials (white paper, white sheet, foil, etc) to reflect light back on the dark side of the item.


Indoors; window on the left.

3. Flash

I don't recommend using direct, straight on flash because it'll wash out the colors and you'll get distracting shadows.

If you need to use flash, you should bounce it up at a white ceiling and or diffuse it. If your flash is built in the camera, you can still try to bounce the light by using a white card or diffuse it with tissue.

4. Light Box

You can buy one or make one yourself. There's a few different set ups. Most DIY ones consist of a cardboard box, white poster board, tracing/tissue paper, and at least 2 lights such as clip on lamps.

My Photo Set Up for the Nom Nom Monsters:


I used the back of a book as the background with natural light coming from windows above and behind the amigurumi. A lamp was on a few feet behind me and I also used white paper from a notebook (on the right) to bounce light on the side of the amigurumi that's a little darker.

Gauge in Amigurumi

In a lot of amigurumi patterns, you'll probably see a note like this: "Gauge isn't important, adjust hook size as needed to achieve tight stitches so stuffing doesn't show through."

I think even in amigurumi, gauge must be considered. If you look at some amigurumi projects on Ravelry, quite a few of them look completely different from the designer's in proportions and overall size. And then the designer gets comments about how it's a "bad" pattern but it's not always the designer's fault.

Even if you use the hook size and yarn weight specified in the pattern, tension still varies from person to person.

Getting tension just right takes time and practice. You should make swatches in rows and in the round to see how your tension is. Just crochet how you normally do it. Then make swatches in looser and tighter tensions so you can see the differences.

If you become more familiar with your tension, it makes it easier for you to modify patterns accordingly if you find that your pieces are coming out smaller or bigger because of your tension, hook size, and or yarn weight.

Tension can also vary for you at times. If you are stressed, you are more likely to crochet too tightly. If you're happy and relaxed, your tension will be just right or even a little too loose!

When I was first learning how to make amigurumi, I had a lot of trouble getting it right. I would use F and G hooks because it was the size that most people used but I kept getting holes. I crocheted too loose... too tight. I decided to try B and C hooks to get a tighter gauge. But after a while, the small sizes hurt my wrists too much so I went up to E hook, then F hook, and now... I can finally use G hook comfortably.  :)

What is amigurumi?


Amigurumi is the art of crocheting or knitting stuffed animals and anthropomorphic creatures. The word amigurumi is a combination of two Japanese words: amu (to knit) and nuigurumi (stuffed toy). Most common themes include: animals, creatures, food, and people.

I've been following Amigurumi for several years now. I don't know the exact origins of this craft and I don't think anyone really knows for sure. But I've watched many amazing designers come and go in the past years and they've inspired many people to create their own amigurumi.

You may have stumbled on their really cute designs on Deviantart, Craftster, or other craft websites.

But the old amigurumi designs from about 5-10 years ago? You're going to find them on personal Japanese blogs/sites. If you search "編みぐるみ" (amigurumi) on Google, you just might find some that are still up today.

Amigurumi are usually characterized by their large heads and small limbs in proportion to their bodies, which is an distinctive feature in Japanese kawaii (cute) designs. They are generally crocheted rather than knitted and most usually use worsted weight/4 ply/medium sized yarn with hook sizes from C (2.75mm) up to G (4.25mm).

Now there are many different styles of amigurumi. I believe amigurumi can be made in which ever techniques to create the look and shapes you want. Whether it is in the round, flat, worked in spirals, joined rounds, any kind of stitch (even the tall and unique ones), crocheted, knit, etc.

Materials that are commonly used to make amigurumi include: yarn, stuffing, plastic safety eyes, and felt for facial features or embellishments.


Tools: crochet hook, knitting needles, yarn needles, embroidery needles, and scissors.

Common skills: crochet, knitting, math, sewing, and embroidery.
There are several other materials & techniques people use including: fabric to create clothes and accessories, glue instead of sewing on pieces, making some pieces out of polymer clay, buttons, beads, sequins, needle felting, and more!


It's important to experiment to understand the construction of crochet or knit pieces. You may need to brush up on your math skills because it'll probably help you when you need to create pieces in a certain size! Just make sure to keep notes of what you do and use so you can refer back to it later.

If you're interested in learning how to make amigurumi, there are many patterns and tutorials on the internet.

Related Posts Plugin for WordPress, Blogger...